Building A Bamboo Rod
Part I.
In this series of columns I hope to give folks an understanding of how cane rods are constructed. Although many rods being built today are built using only hand tools, the majority of classic rods were built with the aid of machines, and so I will also address the use of machines in rodbuilding. Some steps in the construction of a cane rod are also done differently from builder to builder, but overall the procedures are essentially the same.
Despite some of the hype and 'romance' associated with building a cane rod, the essence of cane rod construction is simply forming a series of tapered cane strips and then gluing these strips together to form a blank. There are no great mysteries or magic involved in the process. A rod may be composed of any number of tapered strips. Most common are rods of six-strip design (hexagonal cross section, or 'hex construction'), followed by rods of four strip construction (square cross section or 'quad construction). As I mentioned in a previous column, rodbuilders have experimented with a number of strip configurations but the vast majority of rods continue to be built with six-strip construction.
All rodbuilders start with the same material: a tube of dried grass, Tonkin cane. The walls of the cane consist of three layers. The outermost layer is called the enamel. It is very thin and serves to protect the vessel elements within, much as bark protects a tree. Just under the enamel are the cells of interest to rodbuilders, the 'power fibers.' The power fibers are what give the cane its strength and are densest near the enamel surface. In addition, the thickness and density of the power fiber layer is greatest near the butt end of the bamboo and becomes gradually thinner as one progresses up the plant. This is simply what one might expect-the denser and heavier portions near the ground must support the rest of the plant above. The power fibers also become less densely concentrated toward the center of the bamboo and gradually give way to a white, chalky layer of inner pith. The pith portion has no strength and is so soft it is easily scratched with a fingernail.
Because the enamel has no strength and forms an opaque covering to the beautiful 'grain' of the power fibers below, it is removed at some point in the construction process by sanding or scraping. As the power fibers are densest at the periphery, the cane that will be removed to form the tapered strips is removed from the inside surfaces. This insures that the when the individual tapered strips (also known as splines) are glued together the resulting rod section is composed of as much power fiber as possible.
The raw culm of bamboo may be left in its natural state prior to further processing. Such a rod, with its familiar yellow color is known as a 'blond' rod. A rodbuilder may also choose to flame the raw culm of bamboo with a torch or other device. Depending on the amount and duration of the heat applied to the culm, the finished rod can vary in appearance from light brown to almost back in color. In addition, the heat may be evenly applied over thelength of the culm or applied in a more patterned fashion to produce a mottled or striped appearance.
The resulting cosmetic appearance of the rod, blond or flamed, can become a part of a rodbuilder's 'signature,' and may be a reflection of their beliefs or training about what makes a rod beautiful. On the other hand, some rodbuilders may allow the customer to decide on the appearance. In addition, some builders (ourselves included) believe that flaming the cane tempers the fibers to produce a rod that feels a little crisper and more resistant to taking 'sets,' so there is a reason beyond cosmetic appearance why some makers flame their cane.
Each step of the building process represents a choice for the rodbuilder and when evaluating any cane rod you may wish to bear this in mind. Each of these choices becomes in effect the 'story' behind the rod and the person(s) that built it and are a reflection of many factors. Everything is done for a reason. If each time you look at a cane rod you ask yourself or the builder 'why?' you may stand to learn much more then you bargained for and gain more insight into the craft and our angling tools.
Part II.
In our last column we discussed in a general way how cane rods are built, and ended with a discussion of flamed vs. blond rods. Today we will go into more detail about how the cane strips (splines) are formed from the raw bamboo.
Prior to forming the tapered splines that compose the blank, several operations must take place. First, the culm of raw bamboo is either split or sawn into individual strips. Cane can be split into strips using a variety of methods. In the days when all rods were made of bamboo, mass-producers used large 'battering-ram' type devices that could split an entire culm into a predetermined number of strips in seconds. Small, hand-held versions of this type of tool can still be acquired today.
Another hand method involves the use of a tool called a froe. The froe can be thought of as a combination knife and splitting ax. Like a knife, it has an edge that is pounded into the cane to begin splitting the longitudinally oriented fibers. The froe is also beveled from the edge to provide a fatter surface that acts as a cam to lengthen the split ahead of the blade. The cane literally pops open along the grain much the same way that wood can be split for the fireplace.
A rodbuilder will lay out and split a culm into a desired number of strips. The ultimate yield in terms of how many strips are produced from a culm is limited by a number of factors such as the circumference (size) of the culm and the width of each strip needed to produce a particular rod taper. Typically, rodbuilders will split a culm into either 16 or 24 strips, each about ¼ to 3/8 of an inch wide. Although the split strips do follow the natural grain pattern of the bamboo, the strips themselves are not straight. Unfortunately for the rodbuilder the strips often exhibit kinks through the node areas and long sweeps and bends in between each node. For the strips to be processed further each node and strip must be straightened by hand-a tedious and time consuming process.
In the past some rodbuilding shops used a circular saw to saw the strips instead of splitting them. The advantage to using a saw was that the strips thus formed were almost absolutely straight and could be taken directly to further processing without further straightening. Because rodbuilding has always been a competitive industry, companies that split their cane were quick to point out that 'rip-sawing' the strips sometimes cut across the grain and claimed the companies that did so were producing an inferior product. Over the years this type of hogwash has come to include the use of machinery in rodbuilding, claiming that hand planing the taper into the strips produces a superior product over that produced by machine. We will address this bunk in greater detail in coming columns, but I would defy anyone to cast two rods, identical in taper, but one produced from sawn strips versus split strips. Do this test blindfolded and tell me which rod is 'superior.'
If the strips are split by hand, the next step involves straightening the strips. The strips are heated and upon reaching a certain temperature the cane will becomes soft and pliant and can be bent into the desired straight configuration. If the strip is held until cool it will remain straight. Each node area and sweep must be straightened in this fashion. Today most rodbuilders use an electric heat gun to supply the necessary heat to straighten the strips.
At some point prior to further processing rodbuilders will lay out and cut the strips to the approximate length of the rod section they wish to build. At this stage they will also choose a method to stagger the placement of the nodes so that when the rod section is complete no two nodes will be next to another on adjacent strips. The idea behind staggering the nodes rests upon the supposition that the node represents a 'weak' spot in the cane, and staggering the strips keeps these 'weak' spots from being concentrated in one area. How this idea came about I do not know. If the growing cane did not possess the reinforcing properties of the node, the culm would simply collapse upon itself like a straw and could certainly not grow 40 or more feet tall. The nodes give the hollow grass hoop strength to keep this from occurring. I've examined and cast many old rods that had nodes lying together on adjacent strips and they've felt fine to me and have apparently held up well over the years.
There are many possible node spacing configurations and each one has its proponents. Some manufacturers used a random node spacing because it allowed strips from one culm to be easily inserted into strips from another, thus saving material and time. But bamboo rodbuilding has evolved beyond the simple consideration of producing a fishing tool as quickly and cheaply as possible for every economic niche of the fly fishing market. Today, one would be hard pressed to find a cane rodbuilder that didn't take the time and effort to manually split and straighten the strips and stagger the nodes in some fashion.
Part III.
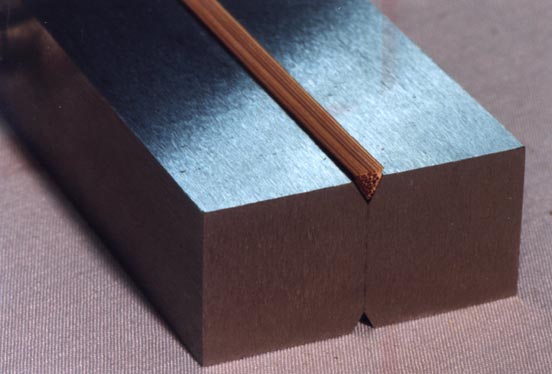
In our last column we covered the splitting and straightening of the cane strips. The picture shows a progression from the roughly rectangular form of a split strip, to the formation of an equilateral triangle, to the binding and gluing of the six tapered triangles that form a rod section. This rod section has been glued with dark glue, resorcinol, which emphasizes the glue lines.
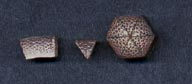
Most manufacturing methods follow this same progression, so the first step is to transform the cane strips into an equilateral triangle. There are as many ways to do this as human imagination permits. Rodbuilders that produce a few rods a year can plane the strips by hand into this configuration with just a small wooden jig to hold the strip at the proper angle. Most professional builders rely upon machinery to assist them in this step. The machines used do not have to be elaborate or expensive. I've seen rodbuilders that have rigged up a simple mill with a router, and such a machine can be produced in just a couple hours and at little cost. This type of machine works by feeding the rectangular strip into a cutter at the proper angle to begin forming a sixty-degree angle on the strip. With each pass the strip is flipped from side-to-side so that cane is removed equally from each side of the strip. A surface planer can also be modified to perform this chore quickly and easily. In addition, special cutters may be used that can cut both sides of the strip at once thereby producing a triangle in only one pass through the cutter.
I remember reading an author claim that rods that are produced by hand are 'sexier' then those made either partially or totally with the assistance of a machine. While this is only one person's opinion, it is patently silly. There is nothing 'sexy' about standing at the bench for hours at a stretch planing strips by hand; in fact it's an invitation for carpal-tunnel syndrome and arthritis. Rodbuilding hobbyists that dream of building rods for a living had better investigate the use of machines to assist them long before they progress deeper into rodbuilding. No less a man then Hiram Leonard knew that he couldn't produce rods in an efficient manner by hand methods alone. Only so many hours can be invested in the building of a rod. The time and effort that is saved by using machinery allows a rodbuilder to concentrate on other aspects of the building process and produce a superior product. No builder from the 'classic' era of cane rods produced an appreciable number of rods over the length of their career without machinery to assist them.
Another silly argument against the use of machines involves the misconception that the fibers of the cane will be cut 'across the grain' unless the strips are made by hand. This is more hogwash that gets perpetuated by authors that are too lazy to do their homework and actually research what they write. The cutting of the strips occurs in exactly the same way whether by hand or machine: with cane being removed from both sides of the strip. If the strips are split and straightened by hand this will simply not occur.
Once the strips have been formed into non-tapering triangles they are temporarily bound together with string and placed in an oven for heat-treating. The heat serves to drive off moisture and temper the cane. Once the cane cools the string is removed and each individual strip is then ready to be tapered.
If a rodbuilder keeps all construction variables constant (heat-treating regimen, adhesive type, etc) the only determiner of the line weight the rod is rated for and its overall 'action' is how much bamboo is present at any given point along the length of the rod. This is known as a rod's taper. By convention rod tapers are measurements expressed in thousandths of an inch, and are laid out at five-inch intervals along the length of a rod. Typically these measurements are begun at the tip and progress back toward the butt end of the rod. If one wishes to copy an existing cane rod it is a simple matter of taking the measurements and duplicating these dimensions. There are no big secrets to rod tapers and their derivation isn't 'rocket science.'
In our next column we will look more closely at rod tapers and how the tapered strips are formed.
Part IV.
In our last column we discussed the preparation of split and straightened strips and forming them into equilateral triangles. The next step in the building process is to taper the strips and glue them together to form a blank.
As mentioned previously, rod tapers are measurements, expressed in thousandths of an inch, of a finished rod section at five-inch intervals along the length of the rod. Most tapers are laid out with the tip end of the rod as the '0' or starting point, and progress back toward the butt. The taper determines how much cane is at any given point along the rod and thus determines the rod's action and the line weight it is designed to cast. Because a six-sided rod consists of six identical triangles, the size of each individual cane strip is one-half of the rods finished diameter.
The traditional tapers used in building cane rods are derived from years of empirical experimentation by rodmakers in attempt to build the best casting rods possible. Over the years literally millions of cane rods were produced with this goal in mind by some of the finest craftsmen in the rodbuilding industry. Since it is a very simple proposition to obtain these measurements from an existing rod it stands to reason that there are no great secrets when it comes to rod tapers. It also should be evident that unless a rodbuilder is working in some esoteric realm (making semi-hollow five-sided rods, for instance) where there has been limited experimentation there is nothing 'new' or 'unique' under the sun in rodbuilding as it relates to tapers. After all, traditional cane rod tapers represent the collective experience of many very talented rod designers over a period exceeding one hundred years.
The strips can be tapered by either hand or machine methods. In the golden age factories relied upon the use of machines to taper the strips. Most of today's hobbyists use a hand-held block plane and a tool called a planing form to remove the excess cane from the strips and form the taper. The planing form consists of two parallel steel bars with a sixty-degree groove running between the two bars along the length of the tool. One side of the form has a relatively deep groove for forming large strips for butt sections; the other side has a shallow groove for forming tip sections. It should be noted that a typical rod tip may measure only about .060 inches, and therefor an individual tip strip is a mere wisp of bamboo measuring about .030 of an inch! The sixty-degree groove is tapered- it become progressively deeper from one end of the form to the other. In addition, the depth of the groove in the planing form can be adjusted by means of screws that push or pull the forms apart or together. These adjustment screws are located every five inches along the form's length and correspond to the convention of rod tapers being determined at five-inch intervals.
The depth of the groove in the planing form is set to the desired dimensions and the cane strip is placed in the groove. (picture) The equilateral form of the strip conforms to the shape of the groove. The hand plane is then used to shave off the excess cane above the surface of the form. Once the strip has been planed down to the surface of the form, the size of the strip is a mirror image of the depth that has been set in the form. The tapered strip is now referred to as a spline. This process is then repeated to plane the taper into the five remaining strips.
Hand planing can be an extraordinarily accurate way to produce tapered strips if the maker possesses good tools, knowledge of how to use them, and takes the requisite care in forming the strips. The use of machines to form tapered strips requires as much or more talent then hand methods and is more akin to the work of a machinist then a hand craftsman. Finely made rods built by machine represent not only the knowledge and experience related to crafting rods, but also the design and operation of precision machinery.
Once the strips for the rod sections have been individually tapered, the splines are ready to be glued together to form a blank. In our next column we will focus on the gluing process and subsequent steps towards finishing the blank.
Part V.
In our last column we discussed how the cane strips that compose a rod section are tapered and prepared for gluing. In this installment we will cover how rod sections are glued together to form a rod blank.
Over the years a number of adhesives have been used to assemble the tapered splines into a blank. Prior to the introduction of synthetic glues, animal hide glues were used. These glues could be tricky to use as both the glue and the rod splines had to be carefully warmed to the proper temperature and the glue had to be carefully monitored for degradation. Because hide glues are not water-resistant improperly glued or cared for rod sections were subject to delaminating. Unfortunately, the occasional failure of hide glued rods earned this adhesive a poor, yet undeserved reputation. If the glue was properly tended and applied, and if the requisite care taken with the rod, hide glues are remarkably strong. Witness the large numbers of rods well over 100 years old that still function perfectly as well as millions of pieces of antique furnishings and musical instruments that are still with us today.
The introduction of synthetic glues largely halted the use of hide glues. Over the years rodbuilders have used urea and phenol formaldehyde glues and, more recently, epoxies. Each adhesive group offers various advantages and disadvantages, and a rodmaker must weigh these aspects into their selection of a proper adhesive. For instance, resorcinol resins are waterproof and very elastic thereby making them ideal glues for fly rods. However, these glues are a dark red or purple color that accentuates each glue line and some folks find this aesthetically objectionable. Urea formaldehydes are strong and easy to use, but are not as water and craze resistant as epoxy and resorcinol. Epoxies are very strong, but cleanup requires solvents.
In addition, each type of glue has unique parameters for pot life, gluing pressure, application temperature, cure time, shelf life, moisture content of the cane, etc. All of these factors must be considered, but properly stored and used synthetic adhesives are very durable and will give satisfactory results.
The process of gluing involves measuring and mixing the components of the glue and applying it to the splines. Gluing the six individual splines into a bamboo blank is a messy and sticky proposition. We have found that it is best to glue several rods at a session and not allow any interruptions during the process. Rodbuilders typically apply glue to the splines with a small brush (a toothbrush works well) and the section is then rolled into the familiar hex shape and bound under pressure using a binder. The binder serves to rotate the rod section and apply a binding cord in a spiral fashion along the rod shaft. The section is passed through the binder twice, which applies two opposing spiral wraps. This cross wrapping assures good clamping and also helps to minimize directional torque that can cause twists in the section.
After the rod section has been bound the maker sights down the section to assess the blank for straightness. At this point the section can be rolled on a flat surface to eliminate bends and kinks in the section. (Invariably some straightening will still need to be performed after the string is removed and excess glue sanded from the blank) The blank is then left to cure in the appropriate environment for a time period specified for the type of glue used. The blank is referred to being 'in the string' at this point in the process.
After the glue has cured the string removed and excess glue is sanded, filed or scraped off of the blank. The sections are again straightened and cut to the appropriate length. This is finally the point at which the work begins to resemble a fishing rod and is now the time for a rod builder to take a well-deserved break.
Part VI.
In our last installment we had completed an overview of the building process up to the point of having a blank constructed, sanded and ready to mount the ferrules. Prior to mounting the ferrules these rod sections will invariably need to be straightened.
Straightening a cane rod or blank is accomplished by gently heating the offending area of the rod and bending in the opposite direction and holding it in this attitude until it cools. As mentioned in an earlier column when cane is heated it becomes somewhat pliable and it is this property that makes straightening possible.
Almost any heat source will do for this chore. Rodbuilders will typically use an alcohol lamp, heat gun, or stove to perform the work. People that wish to remove sets from their own cane rods may do so at their own risk, but until they have some practice in this area it's probably best to leave it up to a competent rod restorer. If one wishes to perform this work on their own it is important to avoid overheating the section thereby causing degradation of the varnish and/or glue. The section needs only gentle heating and should never be hot to the touch. I'm mentioning this here because I've read misinformed but well-intentioned people suggest wearing gloves and heating the cane until it's very hot, or in using steam. Neither is recommended. If the cane is hot to the touch, it's too damn hot!
The straightening of a rod section, like all other steps involved in building a rod is a skill. How much straightening is required is a function of the care taken in other steps prior to this point. Taking the time to straighten the raw cane strips can pay big dividends. This includes not only straightening through the node areas but also removing any long bends and sweeps. Many people view the initial splitting, node dressing and straightening of the strips as a type of scut work, and nothing could be further from the truth. As in woodworking, the care taken in the preparation of the material can have a great impact on the final product.
Tuning the binder and performing some straightening before the glue sets will also help to minimize the time necessary to do a satisfactory job. I have found that it is helpful to view straightening not as one distinct step to be performed after the glue sets but rather a series of processes that occur over the entire course of building the rod. The cured sections may still have long bends (sweeps), kinks and twists to be removed which will be apparent by sighting down the shaft as it is held up to a source of light.
I've read that a straight rod is straight- period. In practice however, it is virtually impossible to make a hexagonal laminate out of a natural material 'perfectly' straight. In all the rods that I've examined I have found one that was, in my opinion, perfectly straight. If one takes the time to examine graphite rods by sighting down the rod and rotating they will notice that they are also not 'perfectly' straight, even though by virtue of how they are constructed they should be much straighter then bamboo rods.
Owners of cane rods can extend the time a rod stays straight by using their rods within their intended purpose, not horsing fish in and occasionally rotating the rod while fighting a good fish to balance the amount of stress placed on the cane. It is also a good idea not to leave a rod assembled and propped up in the corner of a room, rotating the tips, and not using a rod with fine tips to cast weighted woolly buggers! Over time the rod will probably take a set, usually downward (in fly rods) and to the left or right. This will usually not effect the rod's function and can be viewed as part of the rod's history and character rather then a cosmetic imperfection.
Part VII.
In our last column we progressed to the point of having a cane rod blank sanded and straightened. At this point the ferrules can be mounted. Ferrules come in a variety of different styles, but they all perform the important function of joining and holding the rod sections together. All ferrules are simply pieces of nickel silver tubing with a male ferrule (mounted on a tip section) that slides into a female ferrule. (Mounted on the butt section)
Quality ferrules are constructed of machined nickel silver as the zinc in this alloy prevents the metal parts from 'sticking' together. It is imperative that ferrules are prepared properly to slide together well and to be mounted permanently on the bamboo rod shaft. The most common problem with vintage cane rods that we have encountered is a loose ferrule-to-cane bond. This malady presents itself a slight 'ticking' sensation as the rod is cast or the ferrule coming completely off the rod as it is disassembled. If such is the case, have the rod evaluated by a competent restorer.
Regardless of the type of ferrule used, ferrules are designated by the inside diameter of the tubing. The designation is in 1/64ths of an inch. For example a size 13 ferrule has an inside diameter of 13/64 ths or .203.
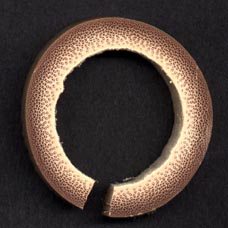
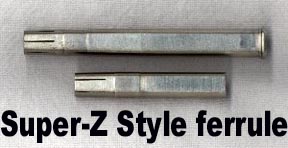
Most rodbuilders use a type of ferrule designed by Louis Feirabend and given the trade name Super-Z. This type of ferrule is designed so that the inside diameters of both the male and female ferrules are equal, as opposed to the Step-Down or Leonard style wherein the inside diameters of the male and female ferrules are different. Since the name Super-Z is a brand name, people making ferrules today may refer to the same style and construction method with another name, such as Super-Swiss. Notice from the photos the difference in the method of construction. The step-down ferrule is from an early Leonard rod awaiting restoration.
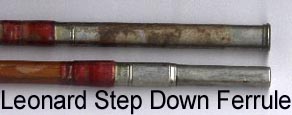
Step-down ferrules are designated by the inside diameter of the female ferrule and with this design the male ferrule must be of a smaller inside diameter in order to fit into the female. The difference between these measurements is referred to as a 'step' or 'drop'.
The theory behind the Super-Z is that since the inside diameters of a given ferrule size are the same, less cane has to be removed from the rod sections to mount the ferrules and therefor the rod section is stronger at this point. It is also easier to mount a Super-Z ferrule as the tip and butt sections need only be turned to one diameter. It is for these reasons that most builders prefer the Super-Z style.
In addition, ferrules may also be supplied as a truncated style. These ferrules are manufactured in the same fashion, but are just a bit shorter in length. These ferrules are used on three piece rods or on two piece rods in applications where the builder thinks that a smaller ferrule will be aesthetically pleasing.
Ferrules are traditionally supplied as a set with one female and two male ferrules. The male ferrules are supplied oversized, which means that the slide portion must be lapped (reduced in diameter) before they will fit inside the female. They are supplied this way so that the builder has control over how tight they wish the fit to be. Some rod customers wish to have their ferrules lapped a bit tight, while others prefer an easier fit.
After the ferrules are lapped, the inner surfaces must be cleaned to remove oxidation and residual flux from the solder used during their manufacture. Finally, the serration tabs must be dressed to make them taper to a fine thickness near the ends. Tapering the serration tabs allows the rod to flex freely at this point and also to provide a smooth transition from the ferrule edge to the rod shaft
The choice of adhesive used to mount the ferrules is up to the builder. The various types that builders use are: hot melt (thermoplastic) cement, Pliobond (rubber) cement, epoxy, or urethane cement. If an adhesive other then epoxy is used, it may be wise to pin the ferrule. I would recommend a two-part epoxy that is formulated for industrial use and will stand extremes in temperature.
Mounting the ferrules is accomplished by turning the cane to the required diameter and applying epoxy to the inside of the ferrule and the seating area of the cane. Care should be exercised when turning the rod section to insure that the cane is turned concentrically. In addition, it is not a good practice to make the fit of the ferrule to the cane so tight that the ferrule must be driven onto the cane under extreme pressure. Epoxy bond needs a film thickness of .001 or more to function properly. The application of the ferrule to the cane may be facilitated by gently heating the ferrule and cane after the glue is applied. A firm and steady push will seat the ferrule, and the serration tabs can be bound down by wrapping with a strong thread or cord.
Customers can do their part to assure trouble-free ferrules by making sure that they are kept clean after use and also prior to joining the rod together. A small bit of dirt or a grain of sand will play havoc with a ferrule! If a ferrule should become stuck and difficult to disassemble it is good to enlist the help of a friend. Here's the procedure: Stand face to face. Each person takes a hold of the rod section with one hand grasping the butt section near the ferrule and the other hand grasping the rod section near the tip ferrule. The rod is slowly pulled apart. Do not 'yank', twist the rod section or use a guide for 'leverage'. A couple pieces of rubber inner tube material can also help to get a good grip on the slick varnish of the rod and can be stashed in one's vest for such an emergency.
© 1999, 2000, 2001, 2002 J.D. Wagner, Inc.
| Jeffrey D. Wagner, Inc. 6549 Kingsdale Blvd. Parma Heights, OH 44130 (440)845-4415 e-mail: sales@wagnerrods.com WWW: WagnerRods.com |