 Creating
the Sans-A-Bitch:
Creating
the Sans-A-Bitch:
Creating
the Sans-A-Bitch:
Creating
the Sans-A-Bitch:
A Nodeless Quad 3p. 5-6wt.
By
J.D. Wagner, Rodmakers
This project began when one of our best friends and customers, Mr. Terry Lambacher, asked us to build a quad version of a traditional hexagonal rod we built for him a few years ago based on a Leonard Hunt taper. I've watched Terry fish his rod with a WF6 line, making long, smooth effortless casts.
This is a sweet rod well-suited for casting large flies such as Green Drakes or Hex flies, and the folks at Leonard developed a great taper for this task
We were finally ready to get started on this project when Terry threw us a curveball: he had seen a Thomas and Thomas Limited Edition rod, the Sans Noeud, built in 1981. People who have visited our website Presentation Rod page know the esteem in which we hold Thomas Dorsey, cofounder of T&T. In the 70's and 80's, Tom Dorsey created and executed an annual series of Presentation rods that in my opinion no one has ever been close to equaling.
Prior to this series by Dorsey, whenever rodbuilders built 'limited edition'-type rods they were typically just regular rods with a few embellishments…maybe gold or ersatz- gold plated hardware or 'special' wrap colors or a higher quality of cane. But other than a few cosmetic touches, there was really nothing that required special talent, creativity or technical challenge in these rods. Even rods that are collaborative efforts with talented artisans- such as rods that feature fine engraving on the metalwork- do not typically include any real new technical challenge or creativity on the part of the rodbuilder beyond fancy cosmetics.
Dorsey elevated the craft to a much higher level and set a new standard with this rod series. Rather than make some easy cosmetic changes he worked to create rods of extraordinary technical skill with truly inventive construction techniques. Although he sometimes incorporated some design elements that had been used in rods prior to this time, Dorsey used novel techniques with an eye toward proportion, form and innovation and approached the craft as an artisan as much as technician. Much as a musician with peerless technique incorporates different musical influences and then molds them into his own unique style, so did Tom Dorsey with his rods.
The 1981 Sans Noeud series is an example of this artistry. Nodeless rods had been made by others prior to this T&T series, and continue to be made today. Typically, when viewing a nodeless rod one doesn't notice much- if anything- different about it from a rod with nodes. If you point out to the observer that the rod is nodeless, they'll look more closely and invariably find the telltale splices- no matter how well done- that are evidenced by breaks in the cane fibers due to a lack of fiber continuity between spliced segments.
The genius of the T&T Sans Noeud was to visually emphasize the craftsmanship in the splices by alternating flamed and blond segments of cane. It seems so simple, but it's really a brilliant idea. Rather than produce a rod wherein the splice technique is virtually unnoticable, why not showcase the craftsmanship and the construction technique so the viewer at once can appreciate it? Immediately upon viewing the rod the observer admires the artistry of the technique. Our friend Terry asked us if we could use a similar technique and make him a nodeless quad.
The first mini-project was to design and build a splicing jig. I had an old splicing block collecting dust under the bench, but didn't want to cut the splices by hand. As a professional, you have to be efficient with your time or the price of your efforts skyrockets beyond reason…or you never recoup your costs if you price the work too cheaply. So, I designed our new splicing jig that can cut a ready-to-glue splice in about 15 seconds. Once I was satisfied that the cuts were superior in quality to hand planing in a fraction of the time, I set about experimenting with the orientation of the splices.
It becomes immediately apparent that the splices can be configured in two ways: with the splices either running parallel or not parallel. A parallel splice is made by making both the first and second cuts with the enamel of the cane face up(or down) in the splicing jig.. A non-parallel splice is made by flipping the strip so that the enamel is oriented 180 degrees from the first cut orientation. I settled with non-parallel orientation for this rod. This picture illustrates parallel and non-parallel splices.

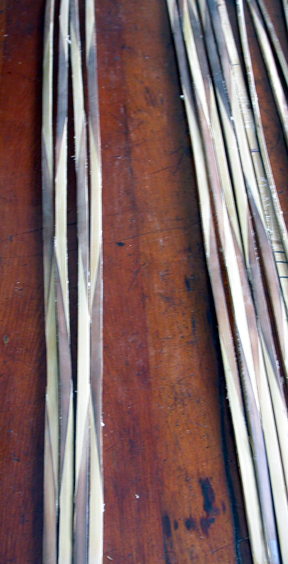
Rather then just cut some strips and assemble them at random, I experimented with how the alternating blond and flamed strips could be oriented once the cuts were made to achieve a consistent pattern as well as one that was novel and pleasing to the eye. In addition, because the internodal distances increase as one moves up a culm I wanted to keep track of where each segment originated from within the culm so that each section could be 'matched'. One half of the culm was flamed, the other left blond. Prior to splitting, the internodal segments were labeled on the pith surface by number with magic marker to denote their mating strips(blond or flamed) as well as the orientation of the strips in the original culm.(i.e. which end of each strip segment was the butt or tip end). The nodes were removed at the chop saw bench, and pieces split.
After the splices were cut for each spline they were layed out in order on the dining room table, and I played with the order of the strips as they would be viewed as a glued blank. Since 'node spacing' is no longer a problem, you could then orient each strip with others in such a way to make some creative patterns. Once I settled on a pattern, all of the strips were then oriented the same way so the sections would match….and the entire rod would thus be 'mirror' matched. This is a picture of the raw spliced segments prior to gluing them together to form strips.
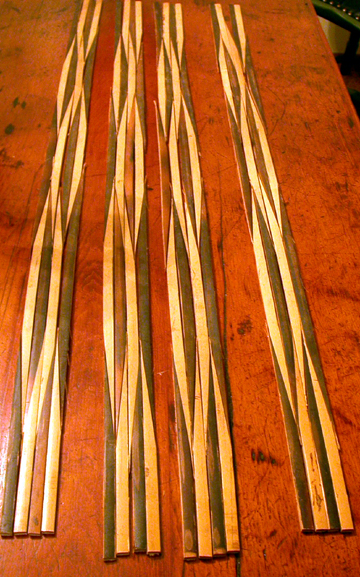
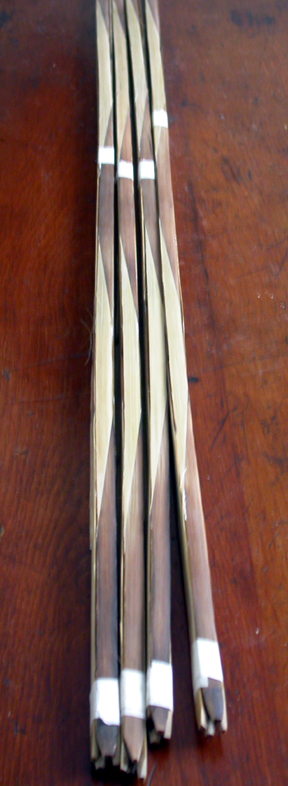
The individual splices were then glued together to form each strip. I used epoxy and simply secured each splice with cotton binding thread by hand. I tried to get the enamel surfaces to line up as well as possible to eliminate 'step' at each splice junction, then let the glue cure. Once the glue was set, the binding string was sanded off and the strips were layed out in their proper orientation. This is a picture of the glued splines, with the binding cord removed, enamel sanded, and 4 strips layed out in the same order in which they would be glued to form the blank.
The strips were then run through our mill to rough cut them into the 45-90-45 degree quad strip orientation. Next came bundling and heat-treating. This pic shows the strips roughed out and kept with their intended mates within each section and at the desired orientation.
It should be noted at this point that although each splice only took about 15 seconds to cut, there were a total of 132 splices in this 8' rod. Is nodeless construction a time saver? Not in my opinion, even with mechanized splice cutting. The gluing process also takes time. If it takes more time to straighten strips with nodes than cutting and gluing all the splices, then more practice straightening is the answer- not nodeless construction. Of course, gluing could go faster with a collection of small clamps but I had no desire to have 50 or so clamps on hand for one rod's worth of splices.
Next came the taper milling and finish with the hand plane. I used our new forms to finish plane and set the taper with a depth gage and 90-degree indicator point. The taper was converted by area/volume from the original Hunt taper by the usual .93 conversion factor. The planing seems to go easier without having nodes present, but I see this as a potential downside, not an advantage. In planing strips with nodes, the node functions as an acid test of the plane's sharpness. Once you see nodes chipping, you know it's time to re-sharpen but with nodeless construction you don't get the benefit of the node 'telling you' when the blade is getting a bit dull. Sharpening is an easy skill to master, so I don't recommend making nodeless as a way around getting and keeping a sharp edge on a plane blade so that nodes don't chip.
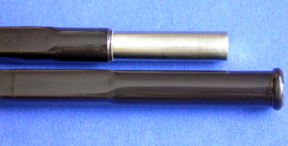
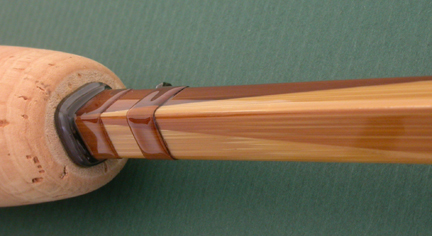
Once the splines were complete the rod was glued up in the conventional manner, then sanded and cut to length. One drawback to quad construction is the necessity to form the ferrules into 'square' openings, another chore that adds to the time necessary to build a quad. I used our quad punches to form Bailey Wood's step down ferrules into the traditional square shape. Once the ferrules were shaped, the ferrule stations were cut on the lathe. This is a close up of the squared ferrules.
One accessory I've found invaluable for cutting ferrule stations on quads is a self-centering 4-jaw chuck. I was able to locate a supplier of a very high quality, but modestly priced chuck. In order to keep the cost of these chucks down by not making a different model for every different spindle thread, you can either purchase a separate adapter or mount the chuck on a face plate. I chose to mount mine on a face plate as they are cheap and easily obtained and frequently supplied as part of a lathe 'package'.
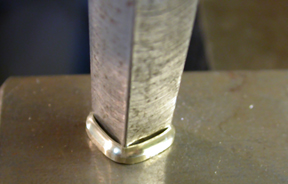
The ferrule stations were cut, the ferrules mounted and pinned. All remaining finishing steps were the same as a hex rod with the exception that the orientation of the blanks for each section were kept consistent. I chose to form a square winding check for this rod, and this pic shows our quad punch forming it.
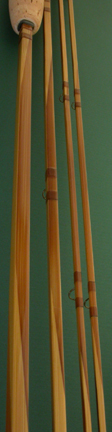
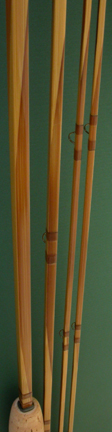
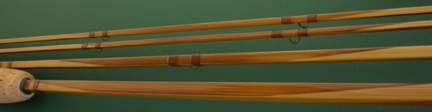
By taking a little extra time to consider the orientation of the splices, the order of the strips in each spline and how the strips were oriented to form a blank some interesting visual effects were achieved. At certain spots along the blank blond and flamed strips come together on adjacent flats to form nice sharp 'mirrored' points.
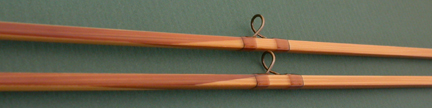
On other places, a flamed or blond flat seems to 'spiral' continuously into the adjoining flat.
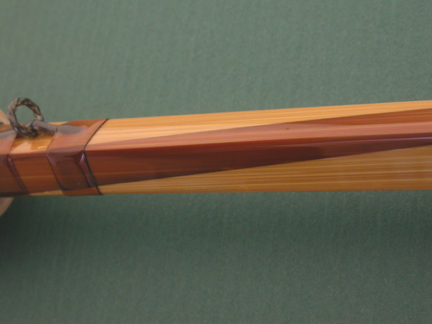
And of course, each splice is showcased nicely thanks to the T&T idea of alternating flamed and blond strip within a spline.
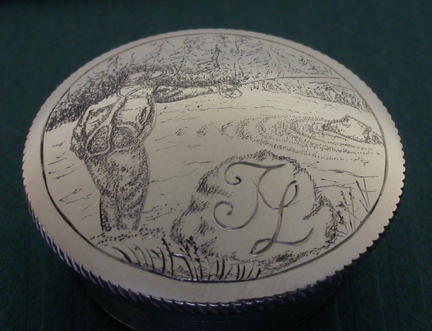
Just to spruce up the rod some more the artist that engraves our metalwork did an outstanding job on the endcap, depicting an angler fishing midstream, with the owner's initials on the rock next to the stream's edge. The engraving is so fine that under high magnification the flyline running along the rod is visible. Yowza!
Each year we've made a special rod like this, we've tried to come up with a little name that captures the essence of the rod or is some inside joke between us and the customer. The story behind our little play on words, Sans-A-Bitch, will be kept between Terry and I.
Acknowledgements: A big thanks to Terry Lambacher for years of putting food on our family. Thanks also to Bob at Powerfibers. Finally, a big thanks to Tom Dorsey for inspiration and setting the standard of craftsmanship we can all aspire to.
Copyright 2003, 2004 J.D. Wagner, Inc.