
By
J.D. Wagner
Several years ago at the Greyling rodmaker's gathering I did a little demo on ferruling a rod. A number of people indicated it was a worthwhile demonstration, and Bob asked if I would do it again for Powerfibers, so here it is.
I will run through the ferruling steps exactly as we do them in our shop, with a few digressions as necessary. The ultimate goal of the process is to lap the ferrules to the appropriate fit and mount them on the rod concentrically and permanently.
Ferrule Prep
I like to lap the male ferrules prior to mounting them on the rod. Fitting them in this fashion has the advantages of speed and accuracy, plus you don't have a long rod section flopping around. For those new to the craft that may not know, male ferrules are supplied oversize, meaning they must be made smaller in diameter to fit into the female. This gives the rod builder control over how tight they wish the fit to be. Personally, I prefer a very tight fit, however I've found over the years that customers-particularly those unfamiliar with cane rods-like them lapped substantially less tight.
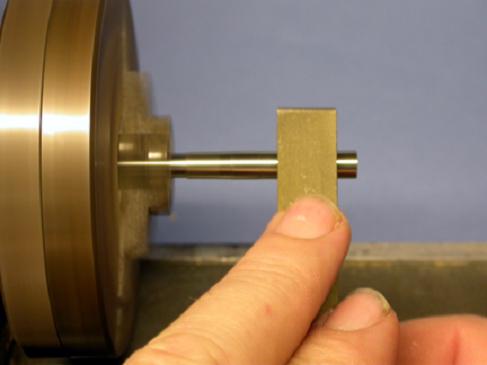
I lap the males on my small Sherline lathe. The Sherline has the advantage of running very quietly and combined with its small size makes it perfect for this chore. On several occasions when the shop was either very hot or cold, I've done this work right in the comfort of the living room while watching TV or listening to the radio.
The male ferrules are mounted on a ferrule mandrill for this procedure. If you don't have a set of those, the smooth portion of a drill bit works well. As all ferrule internal diameters are in 64/th inch increments, a mandrill or drill bit works perfectly. The male is mounted on the end of the mandrill and pushed on until it is fully seated. The assembly is then chucked up in a 3-jaw self-centering chuck.
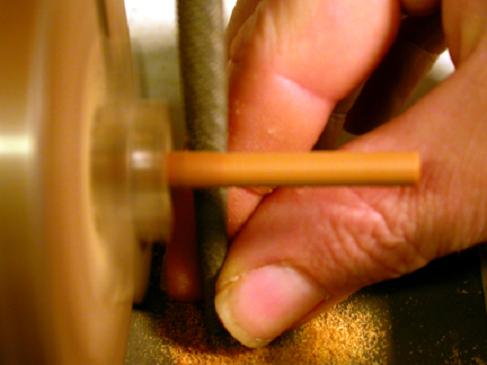
The male slide is taken down to size with either wet-or-dry sandpaper or lapping files, or a combination of both. When I first started using a lapping file, I didn't think it did such a great job but that was a reflection of my poor technique. The tricks to using a lapping file are to run the lathe at the highest speed possible, clean the teeth of the file often, and use a light touch. The lathe is turned on so that the mandrill/ferrule spins counterclockwise towards the operator. I start with a #4 lapping file. I use light upward strokes beginning at the free end of the ferrule and work my way back to the end of the slide. If you find that the ferrule spins when the file is applied, stop the lathe, remove the ferrule from the mandrill and crimp down the serration tabs a little. This will provide enough 'grip' so the ferrule doesn't slip.
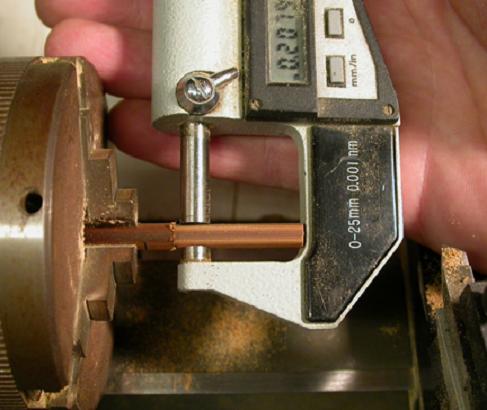
A micrometer is a great aide for fitting because it can tell you how material needs to be removed to fit and also how evenly you are making the slides. For step down ferrules, the diameter of the slide should be very close to the ID of the female ferrule. For example, a size 13 step down ferrule has an apx. ID of .2031, therefore the slide should be very close to that. If you mike up the male before lapping, it might read .2041, so you know you have to remove .001 to get a fit. Before starting to lap a male, check the dimension of the male slide at multiple points. Usually the far end of the slide will be larger than the dimension near the shoulder due to spring back as the slide was cut. Once you have your first male fitted, just mike it and you know how far you need to go for your second male.
For Super-Z style ferrules, the OD of the male slide will be very close to 1/32" larger than the ID of the ferrule. For example, for a size 14 Super-Z ferrule, the male slide will be apx. .250. Because the ID of the tubing can vary a little, it's impossible to predict exactly what the final dimension of the male slide will be, but it will be quite close to these targets.
After a few strokes with the file, I gently round the end of the ferrule with some 1,000 grit paper. I do this because as the file is used a small burr may develop at the end of the male. I then stop the lathe, wipe the ferrule clean and see if the ferrule can be started into the female. Small pieces of rubber inner tube are very helpful for getting a grip on the slippery metal ferrules.
The file will evidence minute bits of metal that can clog the teeth. These are cleaned with a small wire brush as needed.
Once the male is close to seating fully, I switch to 800 or 1,000 grit paper or a #6 lapping file to finish the job. The process is repeated until the male seats all the way up to the end of the slide. If at some point in the process the male becomes stuck in the female, a simple trick to remove it is to leave the mandrill on the male ferrule. Chuck the male/mandrill up in the 3-jaw chuck so the chuck jaws clamp down on the serration tabs/mandrill assembly. A ferrule puller can then be used to grasp the welt on the female and pull the female off of the male.
If you plan on bluing the ferrules, it's a good idea at this point to also work on the female ferrule a little. Chuck up the female ferrule on the mandrill like you did the male. Using sandpaper or a file, dress the area just below the welt and also at the area where the tubing sections are soldered together. Often there is solder residue at these points that will interfere with bluing later.
The next step to mounting the ferrule is to prep the inside surfaces in order for the adhesive to work properly. These steps are absolutely vital if you want the ferrule to stay on the rod and are often overlooked or given scant mention.
Off to a Bad Start
Prior to building rods as a profession I never had a problem with ferrules coming loose. I started building my first batch of rods as a full-time professional in October. On Christmas Eve that year I began delivering these rods. Within just a couple months some troubles began to arise.
What happened was that one by one, some of these rods came back for repair for loose cane/metal bonds. This was not only embarrassing, but also a pain in the you-know-what. Up to this point I had fished my own rods and had never had this occur, so this problem was very vexing. I had changed nothing in my mounting process or materials, so at first it seemed to be quite a mystery. What was different about these rods?
The most obvious thing was that these rods had been taken out to some local trout clubs and fished in the dead of winter. I never fish in the winter, so I began to suspect it was the cold. I called the epoxy manufacturer who assured me that their product was good to X-degrees below zero. Only after some further questioning did he volunteer that this was only if the bond wasn't flexed or vibrated. Not a good thing to hear for a person that is making the epitome of a flexing and vibrating tool!
(But I could at least blame these failures on the adhesive, right? Well, no. I switched adhesives and still had problems although they were much less numerous.)
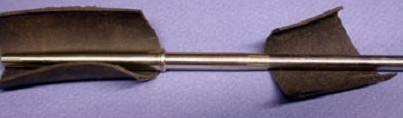
Examining these failures also showed that the bond between the epoxy and wood was intact, but the walls of the ferrules were smooth and free of epoxy residue. This meant the failure was between the epoxy and the metal. This led me to do some research on epoxy bonds that was very helpful in understanding why these bonds failed. (Beyond the problem of the first epoxy not being suited for cold-weather fishing.) A summery of my reading follows.
First off, epoxy bond strengths are directly related to the degree of surface preparation. Each step of preparation, if done properly, increases bond strength by many orders of magnitude. The surfaces must be very clean, and preferably roughed up considerably.
Research has shown that inadequate cleaning of bonding surfaces can actually make bonds weaker then if they hadn't been cleaned at all. It is believed that this is due to spreading a local contaminant over the entire surface of the bonding area. Up until this time I had been using acetone to remove the flux and residual 'gunk' from inside the ferrules. Just for kicks I pulled out a can of flux from my plumbing supplies, only to find that it was insoluble in acetone!! After doing some reading I settled on using an industrial strength de-greasing agent. More on that later.
Bond strength is also greatly increased if the surfaces are roughed up a bit. It is believed that this effect is due to several factors: rough surfaces have more surface area for bonding, the rough surfaces allow a physical 'lock and key' substrate for bonding, and roughing a surface removes microscopic layers of surface oxidation not visible to the naked eye. The metal can look perfectly 'clean', yet an invisible layer of oxidation inhibits epoxy bond strength. In industrial applications metals subject to bonding are sometimes cleaned through a pickling process, ie. soaking the parts in warm, dilute acids -or- they are prepped for epoxy bonds by bead blasting, which has the dual effect of roughing plus removing oxidation.
It was also a surprise to find that I was cutting my ferrule stations inappropriately for epoxy bonding. Following the advice in the old books, I was cutting the stations very tight. In fact, it was common for me to blow out moisture plugs or need to use the tailstock of the lathe to force the ferrule to seat. Making matters worse, once I began to experience these problems, I began to cut the stations even tighter! So it was quite a surprise to find that epoxy needs some 'space' to work, and a film thickness below .001 can effect certain bonds adversely. My advice is that if you are cutting your stations so tight that you blow out moisture plugs, they are way too tight for epoxy to perform at its optimum level.
Cleaning and Roughing
I used to clean the ferrules with an industrial de-greasing agent, Trichloroethylene. I no longer use it as it's not available, and probably for the best.
NOTE: Due to health and envirnomental concerns, trichlor is no longer available. I now use an ultrasonic cleaner with water soluble degreaser.
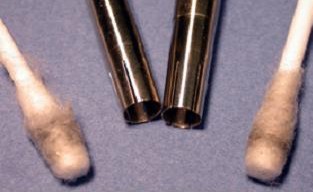
I scrub the ferrules by mounting a brass or stainless brush in the lathe, with the lathe turning away from me. Small copper gun brushes of various caliber work well for this process. Wearing gloves and eye protection, the ferrule is filled with degreaser and then slid over the spinning brush and worked back and forth. The process is repeated several times and then repeated by hand with a Q-Tip until the cotton shows no evidence of discoloration. Or, alternately, you can use an ultrasonic cleaner and Q-tips.
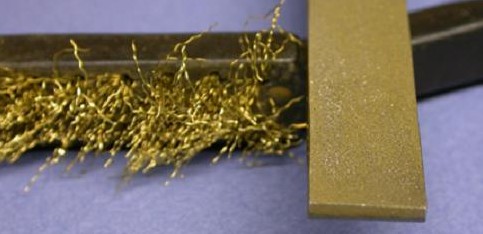
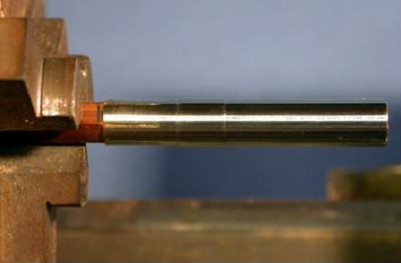
The inside surfaces are then roughed up. I use a couple of rat tailed files for this work, or small stainless steel brushes. Finally, the serration tabs are dressed down on a sanding belt. I use a 280 or finer grit belt and situate the belt so that it runs off of the edge of sander's platen.
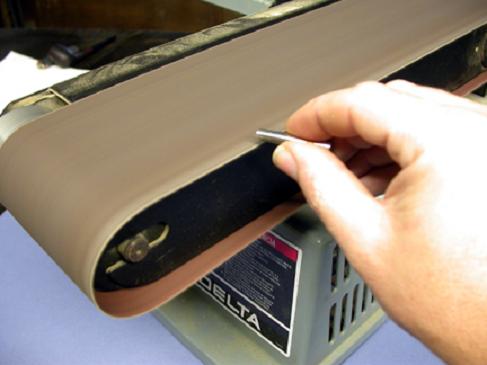
I gently touch the tabs to the paper and rotate the ferrule by hand. This requires a very gentle touch as the tabs are reduced to paper thin in seconds! Note how thin the tabs are on the right.

Cutting the Ferrule Stations
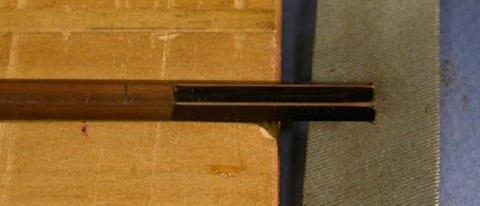
The ferrule stations are laid out on the cane by placing the male ferrule next to the rod sections, allowing a tad for the moisture plugs. Two pencil marks are made denoting the seating depth and the end of the serration tabs. The area of the section from the end of the rod to the first pencil mark is turned to the ID of the ferrule, and the area between the pencil marks is gently sloped to provide a nice transition to the surface of the rod shaft.

When I first got started in rodbuilding I didn't have a lathe and so cut my first couple rods by hand with a file. It's an easy- if time consuming- process, but very accurate work can be done. I recommend coating the cane with black magic marker from the free end to the first pencil mark. A block of wood with a 60-degree groove is helpful to hold the section in position, apex up. Take a couple passes with a file on the apex, counting the number of passes. Pay attention to the width of the 'stripe' that has been cut through the magic marker (layout dye). Rotate the section and repeat the process on each apex and use a micrometer to check your progress. A gentle rolling motion with the file will help round the corners nicely, and by paying attention to the width of the marker lines, you can file away the excess cane almost perfectly. When you are just about at the final dimension, you can switch to 120 grit sandpaper to round the cane to final size.
I now cut the ferrule station on the lathe. For almost all rods, I again use the Sherline. You will need to wrap a couple wraps of tape around the section where it exits from the headstock to avoid it being nicked as it rotates, and you will also need to support the free end with some sort of Rube Goldberg apparatus.
I chuck up the section so that the second pencil mark is near the chuck jaws. Any time you are cutting on the lathe, you want to keep your working distances as tight as possible. The further you move the section out from the jaws, the more it will deflect and wobble, so keep the end as close to the jaws as possible. I do not use tape when chucking the section as the Sherline chuck is just tightened by hand and if you don't overdo it, you won't get marks on the cane.
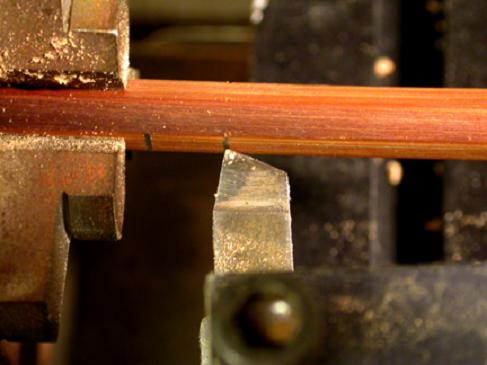
The cutting tool is HSS and must be kept sharp. The tool is moved even with the first pencil mark from the end of the section. The lathe is turned on and the tool is advanced into the cane until it just begins to make contact with the bamboo. This point is evidenced by sound and sight: if you listen carefully you will hear a faint clicking noise and see minute amounts of bamboo dust on the point of the cutter. The lathe is turned off and the section is examined.
What you are looking for are minute nicks on each corner of the hex. Turn the chuck by hand and examine the corners. There should be a tiny nick at each corner. If there isn't a nick at every corner, this may be due to a variety of causes. First, all chucks have some degree of run out, ie. they don't turn perfectly true. Second, each flat-to-flat dimension on your section may not be exactly the same, or the section may not be straight. You can loosen the chuck, rotate the section 1/6 of a turn in the chuck and re-tighten and test this new orientation. You may have to slip some strips of shim(paper) between the cane and the jaw(s) of the chuck to get the bamboo turning true. Adjust as necessary and once the cane is running true you are ready to cut.
I advance the cutter into the cane and take passes that remove about .008 per pass.( More on larger, more rigid sections ) Note that each mark on the hand wheel of the cross slide is .001, but advancing the tool one mark will remove .002 of material! With my tool, it seems to make no difference in the direction of the cut. I typically start at the pencil mark, run the cutter off the end of the section, advance the tool another .008(4 marks on the hand wheel) and move the tool from right to left back towards the start mark. It is not desirable or necessary to back the tool off after each cut, so don't move the tool backward away from the cane.
After a few passes I stop the lathe and check the dimensions. I use a mic and measure across the apexes to see how much further I have to go. Note that the measurement is taken next to the fist pencil mark to obtain an accurate reading! The measurement near the end of the blank will almost always be larger due to some deflection away from the cutter, so the measurement is always taken at the most rigid point. Once I'm almost to the final dimension I advance the cutter to hit the target dimension and take a last pass.
At this point it is wise to note the number on the hand wheel. Since you'll be cutting the other ferrules to the same size, there is no need to keep measuring each section individually: just take a series of passes until you hit the same number on the hand wheel.
You may now need to dress off the end of the cane section to get it a bit smaller to account for the deflection in the turning process. Just dress the end of the section with a strip of 120 paper until the ferrule slides on. The corners between the two pencil marks are then tapered. You can do this work with a small triangular file, sloping each corner individually but you might find it quicker to do it with the lathe running. I do this by placing a rat tail file behind the section so the small end of the file rests on the lathe bed, then angle the file down onto the cane and taper it by hand/eye.
You want a nice smooth transition so the serration tabs don't budge. Test the fit of the ferrule and adjust as necessary.
Mounting the Ferrule
As mentioned previously, I used epoxy for some time for gluing on ferrules but don't use it any longer. I've had good success with ferrule cement. I've never developed the touch to use Pliobond, but other people I trust have reported good results with it. Regardless of the glue you use I highly recommend wearing safety glasses when you use adhesives to glue on ferrules. For the last couple years I've used a polyurethane glue without incident. It has the advantages of being very strong, flexible, and expands a lot when curing. Further, it's a one-part glue so mixing is unnecessary. I just moisten the end of the cane with some spit, put some glue on the section and into the ferrule and push the ferrule on.
It is important that when pushing on the ferrule you grasp the rod section near the ferrule and use an easy, steady pressure. If you grab the section too far away from the ferrule end, you risk buckling the section…snap, and yer work is ruined! If you still have trouble seating the ferrule, gently heat the metal with an alcohol lamp or Bic lighter. The heat will cut the viscosity of the glue and it'll seat right on.
Once the ferrule is seated, the tabs are bound down with thread. We use 20 lb. Dacron flyline backing. While the glue cures it will foam out of the serration tabs, so be careful the section isn't resting on a solid surface or you may just find it stuck to the table the next morning! The glue is allowed to set for 24 hours and the thread is removed for pinning.
Did You Say Pinning?
Yes, I did say pinning and I can't recommend strongly enough pinning ferrules. I think we all got away from pinning because of some advice given in a certain 'bible' that warned mightily against it. Yet the same book noted that ferrules by that maker are sometimes found to be loose!
I look at it this way: there were literally millions of rods made in the golden age of bamboo rodbuilding and virtually all of them were pinned. In proportion to the total number of rods made by all manufacturers over decades, only a relatively few were not pinned. Perhaps it is no coincidence that some of these seem to be chronically loose.
Take Granger rods, for instance. Although they exhibit superior workmanship in other regards, I see more of these rods with loose ferrules than any other quality rod. Often, I've repaired one ferrule on a Granger, only to have the remaining ferrules come loose in short order. It is true that some of these rods may be 40 years or older, but it still makes me wonder.
Usually rodbuilders are afraid to pin for reasons that make little sense. For instance, they cite the fact that we have 'miracle' adhesives that past masters didn't have access to. That may be true, but remember my first 'miracle' adhesive that couldn't stand up to the cold? I've fixed a lot of ferrules that were glued with miracle adhesives! And I fixed ferrules from builders that claim they've never had a problem. There are three types of rodbuilders: those that have had ferrule adhesive failures, those that lie about it, and those that have never had a problem...yet.
The second excuse cited is that the tiny hole made in the bamboo will weaken the cane. Again, this was taken as gospel from the 'bibles' of the craft. One even shows a picture of a rod section, ferrule and pin removed so you can see the hole in the cane. Horrors! Of course it doesn't note that when the pin is in place there is no longer an empty 'hole' in the bamboo.
Looked at another way, how strong does the rod need to be? If you could prove that a ferrule station was made 'weaker' as a result pinning by lifting dead weight with an assembled rod…let's say the rod broke at the ferrule with 20 lbs of dead weight. Does this mean that pinning caused the rod to break? I don't think anyone could draw that conclusion, and in my experience it is very rare to see a rod broken at a ferrule anyway. In the rods I've examined, rods broken at a ferrule are almost always very cheap vintage rods that have no serration tabs and only an abrupt, thick shoulder that has dug deeply into the bamboo after decades of use.
Others have voiced the argument, "well, if the glue bond breaks how is a pin going to help"? Now that's a question that goes right to the point of how a pin works. Bonds can fail from a number of different applied stresses, but for our purposes shear stress is the applicable stress. If you talk to someone that has had a ferrule adhesive failure this is what they say: "I don't know what happened, I fished the rod and it was great. Then I finished for the day, went back to the car and when I broke down the rod the ferrule came right off."
That failure is shear stress in action. If the ferrule was pinned into place on the rod, it is mechanically unable to move into shear, hence it stays in place. You can see barns and antique furniture that are centuries old, and in some cases are held together with only pins as a fastening mechanism. My advice: pin your ferrules. At the least, if the ferrule eventually works loose it will not fall completely off the rod, which is a much greater embarrassment then having one just tick a little. It only takes a minute or two and is well worth it.
Pinning Ferrules
Pinning ferrules is a simple process that consists of three steps; locating and drilling the hole, pounding the pin through, and then clipping and filing the excess pin flush.
On most old rods the pins were located about halfway up the male slide, and on the female about halfway from the moisture plug to the end of the serration tabs. On some old Heddon rods, the pin was located just above the ferrule tabs and this is the location where we pin our rods. (Incidentally, if you are having trouble removing an old Heddon ferrule despite the apparent absence of a pin, look closely just above the tabs. Chances are good you'll find it there if you look very carefully with a magnifying glass.)
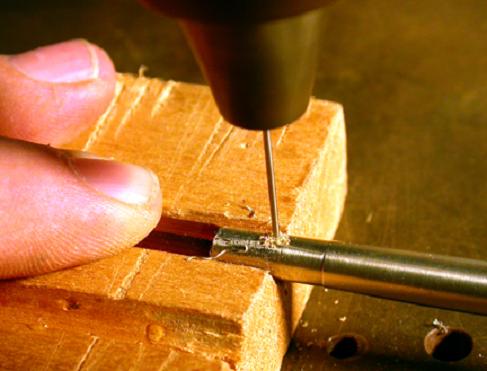
I like to locate the pins in this spot because I can then quickly file the pin flush with a coarse file. Because we wrap our ferrules with black thread, the tabs are not visible anyway. To locate the pin, use a center punch or any small sharp object. A nail will do in a pinch. It helps to have a v-block made up to hold the section during center punching and drilling. Once the pin locations are laid out the ferrules are drilled on the drill press again using the wood v-block for support
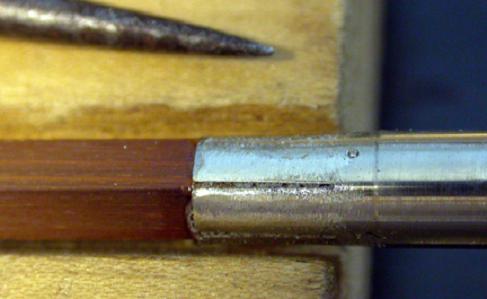
Here the ferrule has been center punched prior to drilling.
And drilled in the drill press....
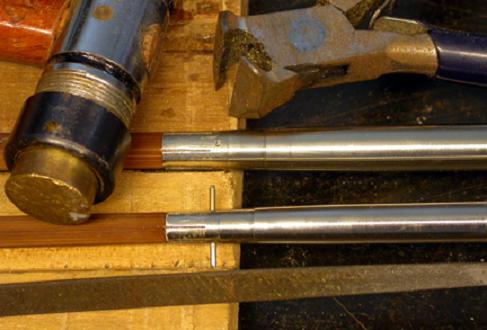
A small piece of pinning wire is cut and driven through the hole with a small mallet. The pin stays in place by friction as the hole is slightly smaller then the diameter of the wire. If you have some runout in the quill of your drill press, the fit of the pin may be a bit sloppy. An easy way to get a tight fit is to bend the pin slightly into an arc, so that it functions as a spring as it is driven in. I highly recommend that you do not glue the pin in place.
Clip off the excess protruding wire. We use a snub nose pair of pliers, but if you do just a few rods a year you can use a cheap pair of nail clippers. They will eventually wear out, but a new set can be purchased for less then .50 cents.
I hope this article is of assistance to you, and thanks to Bob M for sharing it with everyone.
Text and all images, Copyright 2003, 2004, 2005, 2006, 2007, 2008, 2009, 2010, 2011, 2012, 2013, 2014 J.D. Wagner, Inc.