Finishing A Cane Rod
Well, we've reached the homestretch of the building process and all that remains is to fashion the grip, mount the reel seat, wrap the guides and varnish the rod. This is not to mean that these steps are of lessor importance then all of the preceding processes. In fact, it stands to reason that given blanks of equal quality, the skill and care with which the finishing steps are performed will make a major impact on the quality of the finished rod. Today there is far more emphasis on fine finish work then ever before, and in most cases rods made by skilled builders far surpass vintage rods in this respect.
A huge amount of the credit for elevating the craft of rod finishing to the level of art goes to Tom Dorsey and the late Tom Maxwell. Working together to establish the Thomas and Thomas Company, they were pioneers in looking at the cosmetic appearance of a rod in a different way-from the perspective of the artist. The details of form, proportion, color, and texture were all considered along with the technical skill necessary to do take this work to a new level. Much as an artist or musician draws various influences into their repertoire and then combines these ideas with skill and taste, they developed their own unique style and set a new standard for the quality of this work.
The finishing steps provide the maker with an opportunity to be creative and impart their personality and individuality into their work, and in an artistic sense this can separate the exceptional from the mundane. The best rodbuilders pay attention to these details both out of pride and a desire to express themselves in their own unique way. The development of an identifiable style can allow a knowledgeable person to scan a mixed rack of rods from across a room and immediately recognize who built every rod in the rack.
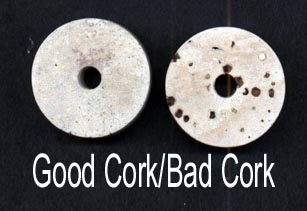
The first step towards finishing the rod is to mount and turn the grip. Cork is supplied to the rodbuilder as individual rings, usually 1 ¼" in diameter by ½" thick, with a ¼" bore. Most cork is grown, harvested and processed in Portugal and is actually the bark of the cork oak tree, Quercus suber. This amazing plant is unique in that the bark can be carefully stripped without damaging the tree. A cork tree must be 25 years of age before it can be stripped for the first time and can be stripped every nine years thereafter. Some cork trees can continue to be harvested for over 200 years!
The number and sizes of the spaces present determine the grade (quality) of cork across the diameter of each ring. Because cork has many uses and a limited supply, premium grade rings are expensive. It is a surprise to most people that other then the ferrules and real seat on a cane rod, the cork in the grip can represent the next highest investment in materials. Today, conscientious builders use a higher grade of cork then found on vintage rods. Although there is some degree of uniformity between different manufacturers with respect to the grading system, the grading can at best be termed subjective and even bags of high priced cork contain a few 'clunkers'.
To fashion the grip the cork rings are bored out to allow the rings to be slid into position on the rod shaft and simultaneously glued together and to the blank. A jig called a cork press is used to push the rings securely together. Once the glue has cured the rod is placed in a lathe to turn the grip. The rotating cylinder is first trued and then the shape of the grip is imparted. The shape can be fashioned by elaborate tools or simply by hand using progressively finer grits of sandpaper.
The shape and size of the grip is determined by both practical and aesthetic considerations. A well-made grip has pleasing size and symmetry and appears to flow naturally from the rod shaft to the reel seat. In addition, the grip should be in proper proportion so that the rod is both comfortable to cast and controllable at all times. This is an area where individuals have their own preferences about what constitutes an ideal grip and the cane rod builder can work with the customer to reach a satisfactory solution. As a general rule, larger rods have larger grips and smaller rods, smaller grips. This helps to achieve both comfortable function and pleasure to the eye. There are limits however, as a large bulky grip on a light weight rod can ruin its appearance just as much as a diminutive grip on a large rod may render it uncomfortable to cast and control.
Varnishing
In our last column we discussed the mounting and turning of the grip. All that remains is to varnish the rod and wrap and seal the guides. The good news is that today it is possible for a beginner to achieve better finishing results then the vast majority of all 'classic' rods if they wish to pay attention to the details and invest the time and effort necessary. A major reason for this is that most people dip-finish their rods. Although dipping is by no means foolproof, it does substitute for the years of experience necessary working with a brush and the results are as good or better then hand methods. Indeed, many of the classic rods that were finished with a brush fall far short of the quality that can be achieved today. This may seem to be heresy, but it is true and in no way denigrates the skill that it took to finish a rod as well as some makers did in the past.
Dipping, however, is not a foolproof method to achieve a theoretical 'perfect' finish. The more you work with varnish, the more you realize that it can be finicky and seemingly have a mind all it's own. In addition, the manufacturers of varnish will, from time to time, change their formulations. I have had the experience of opening a can of an old favorite finish to find that the color and odor (which is a reflection of the ingredients) has changed despite assurances from the supplier that they have not tinkered with the formula. Right!
Today, most makers are finishing their rods with a polyurethane varnish. I have heard cane aficionados turn up their noses at the use of polyurethane rather then spar varnish, declaring it to be a form of plastic! Well, guess what? All spar varnishes made today that incorporate alkyd or phenolic resins are also forms of plastic! The choice of what's 'best' is entirely up to the maker, both spar varnishes and polyurethanes are widely available and produce excellent results. I would however, when restoring a classic rod, always choose a spar varnish as the finish. This is probably more out of a respect for tradition then any practical reason.
Regardless of what you choose to use you stand a good chance of producing a superior finish if you have a quality dipping setup and are willing to experiment with different types of varnish. The components necessary include your finish, a dip tube placed in an enclosed area, a reversible motor to withdraw the sections and a means to keep the temperature of the enclosure constant. It is not necessary to spend a ton of money on special dip tubes, DC motors and rheostats, or HEPA filters to achieve great results.
A dip tube can be inexpensively constructed out of a length of PVC tubing with an end cap cemented in place. A simple reversible AC motor is easy to find and the withdrawl speed can be governed by turning an arbor to the proper diameter. Most people seem to favor a rate of about 4"/minute.
Enclosing the setup will allow one to accomplish two things: keep the temperature of the varnish constant and eliminate problems with dust. The viscosity of the varnish and its cure time is a function of temperature. It is not necessary to varnish at high temperatures. It should be remembered that most varnishes are formulated to work at room temperature, and thus they will perform best at the recommended application temperature range. A few ordinary light bulbs can serve as a heat source for the booth. The enclosure also functions to seal out drafts. It is obvious that dust is heavier then air, so if drafts are eliminated dust will settle to the floor. As long as the rod sections are clean before dipping and the varnish is kept free of contamination your dust problems will be minimal, and any minute problems can be safely removed by rubbing out the finish after the varnish cures.
I've spent hundreds of dollars experimenting with different types of varnish-both polyurethanes and spar varnishes. Virtually all have produced very good results right out of the can or with a little thinning. The differences between types can be very subtle, and for a builder the decision of what product to use can be a matter of availability and personal taste.
Two possibilities exist for the dipping process: varnish the blank first without the guides in place, or wrap and seal the guides first and then varnish the rod. There are advantages to both methods. On one hand, varnishing the blank without the guides in place can be a little quicker. As each section is withdrawn from the dip tube, one must stop as each guide clears the varnish surface to allow excess to run off the guide. So dipping a section without the guides in place means that the section can be pulled out without stopping. On the other hand if one wraps and seals the guides after varnishing, more coats will be needed on the wraps to build a sufficient film thickness and more care is also necessary to do a neat job.
Small imperfections that might remain after the last coat is applied can be removed with fine abrasives. I start with 1,000 grit wet-and-dry automotive sandpaper, followed with an automotive rubbing compound to remove any traces of scratching from the sandpaper. In the old days, rods were frequently rubbed down with rottenstone (a very fine abrasive) to a semi-gloss appearance that produces a nice warm look and also helps to hide small dust problems.
In our next column we'll wrap and seal the guides, and then we'll finally be ready to go fishing!
Wrapping the Guides
This is the last installment of the building process and concerns winding the guides on the rod with silk and sealing the wraps. As mentioned in an earlier column, the guides can be wound on the rod either prior to varnishing or afterwards.
Although some late manufacturers used nylon thread to wrap cane rods, silk is the traditional and the most widely used thread for wrapping. Silk comes in various sizes and the size within a grade can vary from manufacturer to manufacturer. Most common sizes are A and 00, with the 00 being the finer and most commonly used. The silk fiber comes from the silkworm, Bombix morii, and undergoes extensive processing to reach the stage of becoming the thread we use to wrap rods.
The individual filaments are spun from glands on the worm called spinnerets and each individual strand in its natural form is composed of two identical fiber units that are bound together with a type of biological glue called sericin. These fibers are woven into a cocoon. These cocoons are then harvested and the long process of unwinding the individual fibers, twisting them into thread and dying then commences.
Prior to wrapping the guides on the rod a builder first must consider where and how many guides will be used, as well as the color of the silk. As a rule of thumb there is one guide for each foot of rod length (plus the stripping guide) and the distance between each guide increases from the tip to butt ends of the rod. A rodbuilder may either use the guide spacing used on the original rod they are attempting to emulate, or they may experiment to find what they believe makes the rod cast best.
On many classic production rods one difference common between models of different price ranges was the number of guides wrapped on the rod and the presence or absence of tipping or decorative wraps. Like all other steps in the building process, wrapping is labor intensive and manufacturers found they could cut costs by using less guides and wraps.
The choice of the silk color is another important consideration. Some builders and buyers prefer color tones that harmonize well with the color of the cane, while others prefer a more exuberant appearance. To each their own!
Once the placement of the guides is decided upon, most builders take the time to grind or file the feet of the guide so that the foot of the guide tapers to a fine point. This allows the thread to be wrapped over the guide foot without a visible 'break' in the thread. The wrap begins by securing the end of the thread by crossing over a wrap or two, then continued up the guide foot. It is not necessary to use elaborate or expensive jigs to provide tension to the thread while wrapping. Once the guides are all wrapped a rodbuilder may use a burnisher to flatten the wraps and eliminate any small gaps in the thread.
The next choice of the rodbuilder is color preserve and seal the wraps, or seal the wraps without using a color preservative. The cosmetic look of each option is very different. Color-preserved wraps in their finished state appear opaque and much the same as the color of the silk as it comes from the spool. The guide feet and rod shaft cannot be seen through a color-preserved wrap. Either shellac or lacquer can be used to color preserve wraps.
The second choice is to simply apply varnish to the wraps, and this gives an entirely different look to the wraps. In this case the wraps become translucent and the color of the thread can change dramatically. Several coats of varnish are usually used to completely seal the wrap and secure it to the rod shaft.
Once the finish has cured, it's time to deliver the rod and go fishing!
As we draw this series to a close I hope that you have a clearer understanding of how cane rods are made and the huge number of individual steps necessary to turn our raw materials into a finished rod. Most professional rodbuilders will have invested anywhere from 30 to 50 hours of their time and creativity in this effort, and there is nothing they'd like more then for you to hit the water and have some fun with your new toy!
© 1999, 2,000, 2001, 2002 J.D. Wagner, Inc.